Tuesday, July 14, 2009

Light Trails

I have wanted to try some light trail photography for some time now. I finally had the opportunity and the motivation this last week. Light trail photography is a type of abstract photography that uses long exposures at night to capture vehicle headlights and taillights streaking across the frame.

Equipment
There are a few key pieces of equipment needed for successful light trails. One question I have been asked a lot is: can you take light trail photos with a digital point and shoot? Maybe. It all depends on whether or not your point and shoot has the ability to manually control exposure to any setting. Most point and shoots do not allow this level of control, however.

An SLR or DSLR is really needed to get these photos done successfully. The best film to use is Fuji Reala 100ASA, or if using a DSLR set the ISO setting to 100.

You will, of course, need a tripod. A sturdy one at that. With the long exposure times, you will need to make sure the camera does not move at all.

A shutter release cable or remote is another essential item. Most shutter release cables have locking features that will allow you to lock the shutter open, then press the button again to release.

Location, Location, Location
When scouting locations there is one critical element to keep in mind: light. Usually you would want an abundance of light when taking night photos, but this is different. Here, you want as little light as possible.

The most striking light trail photos are ones where the only light comes from the vehicles. So, finding a dark area to take the photos is better than, say, along a downtown city street surrounded by street lamps.

The photo below was a light trail photo I took near downtown Wilmington, North Carolina. I learned a very important lesson that night about locations: watch out for traffic lights. First of all, the bright green and red from the traffic lights was drowning out the action of the shot. Secondly, this particular intersection was on a 30-second switch regardless of traffic. 30 seconds was just about not enough time to allow enough vehicles to pass through to make the shots interesting.

Also, try to find a location that might have one bright object to anchor the photo with. The water fountain in the photo below was a good anchor point. I was surprised at how clear it and the house opposite the fountain turned out.

Timing
Just because this needs to be a night photography shot does not mean it should be done at 2AM. I took my photos at about 11PM, and that was almost too late. Timing is key because of the amount of traffic.

First of all, a great time to get some interesting light trail photos is just after sunset. The sky is just darkening, headlights are on, and there will usually still be a good amount of traffic out and about.

Another good time to go is around 2AM on the weekends. I live in a city with a fairly busy downtown area for night clubs and bars, all of which close at 2AM. Hundreds of vehicles, mostly taxis, start to pour out of downtown between 2-3AM on Friday and Saturday nights.

Technique
Alright, now it's time to actually give it a go. Some additional equipment I would suggest that I did not list above is a flashlight, a chair, and a blanket or jacket. I took the photo below in June, so it was still 85 degrees at midnight.

After setting up the camera and tripod equipment, find your location and hunker down. Make sure you are comfortable, because you could be there awhile.

Because you are shooting in low light conditions, whether it be 8PM or 2AM, your light meter will probably be useless. So, it is a fair amount of guess work involved with aperture and exposure.

I usually keep an aperture of either 5.6, 6, or 8. I usually try for an exposure of between 8-15 seconds, although using a much longer exposure will not affect the quality of the image. I think you would find it very difficult to over-expose a night shot.
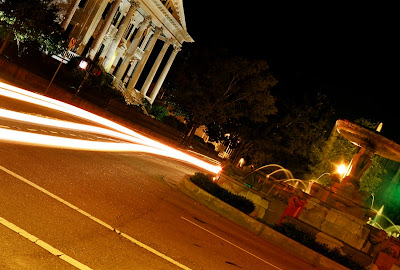
This photo was taken with a Pentax K1000, Fuji Reala 100ASA, f/5.6, 12 second exposure. I took several other photos that night with exposures up to 30 seconds, all of which turned out rather nice.

Now, it's time for you to get out there and give it a try yourself. Just keep in mind to bracket your shots with exposure times. All that is important is to catch those headlights/taillights!

Monday, June 1, 2009

Zen Photography

I joined a weekly photo contest on Facebook for fun and experience. Each week, a different them is employed, people upload pictures, and we vote on the best. This week's theme threw me for a loop, however: Zen Photography. I didn't have a clue what this meant, so I did some research.

Zen in photography is synonymous with Minimalism. The purpose of Zen Photography is to take photos that are simplistic with a minimal of everything. Remove all distractions from the eye. This would include Macro Photography, using close-ups extensively, and special lighting.

Unfortunately, I don't have any good photos yet to display Zen Photography. But on the flip side, I have found two really good websites that explain this topic in different amounts. The first site, Zen and Photography, shows many different examples. But there is a common theme to each photo: very, very few details. Think of it this way: a photo of a baseball game might show hundreds of avid fans watching a ball go over the right-field wall. Zen Photography would instead focus on just the eyes of a single fan watching the ball sail over the wall. No distractions, only one subject, very few details.

A second website, TZ Planet, discusses in pretty good detail about minimalism. This site has few examples, but they again all share a common theme: no distractions. There is also a good list at the end of the article that will guide you towards Zen Photography.

I walked around downtown Wilmington one day attempting to find some good subjects for Zen. I didn't find much of anything good that day. Thinking back about it, I tried too hard. I tried to find specific subjects, then tried to get close enough to completely fill the frame, all the while trying too hard to fit the profile.

Instead, I learned a few simple tricks that work extremely well with Zen Photography:
  • Stay within 100 yards of home. You shouldn't need to go far.
  • Forget taking whole pictures. Taking photos of pieces of subjects, such as just a doorknob instead of the entire door.
  • If you can see the background, move closer
  • Use a Close-Up filter set if you have one
  • Play with lighting. Create shadows. Sculpt a subject with light to get a perfect angle.

Sunday, May 31, 2009

Night Photography

I have wanted to get into Night Photography for awhile now. It is somewhat daunting when dealing with an old-fashioned film camera for one main reason: you can't immediately see what you have done. In addition, the light meter is near-useless and math doesn't do you much good.

Night Photography is difficult because of the manner in which the photos have to be taken. But before we get to that, here are a few items that will be necessary to taking photos at night:
  • 100 or 400ASA film
  • Tripod
  • Shutter Release Cable
  • Camera
  • Flashlight
  • Notepad
In order to take good night photography photos, you need to expose the film for a long period of time. All camera have a setting for exposure called "B" for Bulb, which is a manual exposure setting. This setting allows you to depress the shutter button and keep the shutter open for as long as you hold the button.

The amount of time you keep the shutter open will vary depending on many factors: film speed, your light source, and your affect on the film. Since this varies so much, I have posted many pictures below to show the different affects.

On average, however, you will probably use around an f/8 stop and an exposure of 5-10 seconds. This is where the tripod and shutter release cable are essential. You can't touch the camera if you are taking photos with such a long exposure. The release cable allows you to trip the shutter for any given amount of time without touching the camera.

The light meter built into the camera becomes useless as soon as you switch the exposure to B. The onboard meter uses a combination of film speed, aperture, and exposure to determine the meter reading, but as soon as you set it to the manual setting you take that factor out of the equation. This is one of the difficult factors of Night Photography.

Now for some examples. All the examples below were shot on 100ASA film, which is actually on the slower end of film speeds and requires more light, thus a longer exposure at night. Below each picture I will list the focal length, aperture size, and exposure. See which you think came out best.

50mm+Wide Angle Attachment, f/5.6, 1 second

50mm+Wide Angle Attachment, f/5.6, 5 seconds

50mm+Wide Angle Attachment, f/5.6, 10 seconds

50mm+Wide Angle Attachment, f/5.6, 15 seconds

Of all the above photos, I think the 10 second exposure is the best. The only enhancements I made to that photo were to remove the lens flares I had not anticipated that night.

The 1 and 5 second exposures simply didn't have enough light to work with. Keep in mind these were all taken with an f/5.6 shutter, which is a stop larger than the f/8 I suggested earlier. Although it is possible to open the aperture further, I would not recommend it. The ideal range for all lenses is +-1 stop from an f/8.

The 10 second exposure had plenty of light for all the areas I was interested in capturing. The reason I don't like the 15 second exposure is because of the water: at this exposure the water is much more blurred than at the 10 second exposure.

So for this batch, an f/5.6 and 10 second exposure worked well.

135mm, f/8, 1 second

135mm, f/8, 3 seconds

135mm, f/8, 10 seconds

135mm, f/8, 20 seconds

With these photos, I again think the 10 second exposure is just right even though I closed down to an f/8 aperture. You can really see the difference between a 3 second exposure and a 10 second exposure. These were taken with a longer lens, the 135mm, at an f/8 so it seems 10 seconds is the good exposure for both.

50mm+Wide Angle Attachment, f/8, 1/125

50mm, f/8, 1/60

50mm, f/8, 5 seconds

50mm, f/8, 10 seconds

Again, I would say the 10 second exposure is just about right. I edited blemishes from this photo, but I did not enhance lighting or color. The lights from both the water fountain in the foreground and buildings in the background provided enough lighting over 10 seconds to properly light the scene.

I would say all told I spent an hour taking all these pictures on this particular night. It was a great learning experience, one which I am eager to repeat. Unfortunately, Wilmington is not a town of beautiful lights at night really. Street lights just don't cut it.

I am, however, eager to give another area of Night Photography a try: Light Streaks. Light Streaks are photos taken at night in which a light will move across the frame. Typically speaking, cars headlights/taillights and stars are the main subjects of this type of photography. I will post another entry at a later date when I give this a try.

Saturday, May 30, 2009

Rain Doesn't Stop Photography

I often hear people complaining about rain ruining a perfect photographic day. Why is that? Rain simply brings a different aspect to photography: water. I personally love water and water features, so I jump at a chance to take rainy day pictures.

I went out to the Johnnie Mercer's Fishing Pier while it was raining one day. In fact, it just started to pour when I got the pier. People started running off the beach, ducking for cover, and running underneath the old concrete pier. I, instead, paid my $1 to walk out on the pier and snapped off the photo above. I used a 135mm lens, focused closely, with an exposure of 1/500. I wish the raindrops could have been falling on something other than wood, but this turned out good anyway.

I got this picture a few minutes later. I figured since it was raining I might as well get something to eat. While sitting outside in the covered patio area on the pier eating, I saw this seagull just hovering in the wind. The wind was blowing to the left in this photo, so the seagull just hovered above the table for a few minutes before finally landing.

The thing I love the most about rainy days at the beach is that it never really last a full day. In North Carolina, a thunder storm can pop up in a matter of minutes, dump an inch of rain in an hour, and then disappear like it never happened. By the time I had finished eating, the rain was gone and this was the photo I got.

The clouds surrounded Wrightsville Beach like a puffy cotton ball halo. Reminded me somewhat of a hurricane. But the point is that I was still able to get some great photos despite the rain.

I used a 135mm lens with the Wide Angle Adapter for this photo. I have done some reading and most people have stated this is a mistake. Never use a Wide Angle Adapter on a lens longer than 50mm is stated in several books. But after taking this picture, I don't see why I shouldn't. The affect I got was a long lens to capture a narrow angle of view, but with the Wide Angle Adapter I got everything from beach to the top of the clouds. With the 50mm lens I also got a lot of junk along the sides such as houses and the edge of the pier.

The last photo I snapped off before I called it a day was a beautiful shot along the edge of the pier. By this time, probably 30-40 minutes after the rain had stopped, the sky was clear, birds were fluttering by, and people had come back out. I was so happy I decided not to just stay indoors because of the rain. I got some great pictures this day, some that I could not have gotten on a clear and sunny day.

Friday, May 29, 2009

Getting Started: What Camera Equipment Will You Need

When I first started out in photography, I searched the internet for days looking for the key terms "camera equipment". I found a lot of pages, a lot of sights, and a lot of equipment. But I ultimately disappointed.

First of all, I discovered that many web sites devoted to film equipment are for professionals, with equipment costing hundreds of dollars. That was out of my reach. Then I found dozens of amateur pages loaded with good equipment, but no explanation about what half of it was or how it worked.

So, I have devoted this entry to all the camera equipment I have put together over the last few months. Keep in mind, all this equipment is solely for Single Lens Reflex or SLR cameras. I started out with a Pentax K1000 because my grandmother gave me two of those cameras a few years ago, and believe me, this is an incredible camera to start with. So, without any more rambling, here is my camera equipment list (an abbreviated list is below):

Pentax K1000 Camera Body
I have two of these, so I can have to different film types loaded at all times. Works out good that way. The K1000 is a durable camera body that is manual control only. This body uses K-mount lenses only that measure 49mm in diameter. These cameras have a built-in spot meter for measuring exposure, and in my experience as long as you keep the battery fresh the meter works good. On average, these cameras can be bought in kits from Ebay for about $60. The kits will usually include the camera body, a 50mm lens, a 135mm lens, and a flash.

50mm Prime Lens
This is the most basic lens for any 35mm SLR camera. The human eye sees the equivalent of 40mm, so the 50mm lens is close to what we see at certain distances. All lenses for the Pentax K-series are 49mm in diameter, which makes a difference when purchasing filters and hoods.

135mm Prime Lens
I use this lens most often. I personally prefer a shallow depth of field, and a longer lens is just one of four ways to accomplish this effect. I also like being able to stand 1 1/2 times further away from the subject and getting the same framing as the 50mm lens.

80-210 Zoom Lens
The workhorse of any photographer. This lens can a wide variety of shots quickly, going from a frame slightly smaller than a 50mm lens and much larger than the 135mm.

28mm or Wide Angle Lens
I have a Wide Angle attachment that can screw onto the front of my 50mm prime lens, but the 28mm lens also give the same affect. Since this is wide angle, you are able to get much closer to any subject and maintain a wide composition.

UV Filter
This little filter does not affect color or exposure at all. Instead, it blocks out dangerous UV rays from affecting the film or lens of the camera. It also serves as an excellent protection for your more expensive lenses.

Circular Polarizer Filter
When outside, I never take this filter off the camera. The purpose of the CP filter is to polarize the light bouncing off objects in the frame. With the polarizer rotated a certain direction on the lens, it will highlight reflections from water, glass, and brighten the sky. Rotate the filter 180 degrees, and it will make any reflections from water disappear and darken a blue sky.

Sunrise Filter
This nice filter is half shaded in a dark orange and half clear. The purpose is when taking pictures of a sunrise or sunset, you can attach the filter, rotate it properly, and turn the sky a nice orange hue.

Close-Up Filter Set
These sets usually come in +1, +2, and +4 increments. All lenses have a minimum focus distance, which grows larger with a longer lens. With the close-up set, you can use a 50mm lens and stand just inches from a subject such as a coin or spider. This is essential for doing Macro Photography.

Flash
Currently, I only have the flash that came with the camera, which is actually a really bad flash to use. From my research, I have found that two things are needed here for good Flash Photography: a flash extension and a better flash. The extension is to get the flash away from the lens, which causes red-eye. A better flash with use a different light source and therefore affect color temperature and affect on the subject. I will post more here when I get into Flash Photography of my own.

Shutter Release Cable
These cables screw into the shutter release button on the camera body. It allows you to snap off pictures without having to touch the camera. This is essential when doing Night Photography or when using long exposures for other special effects.

Lens Cleaning Kit
Lenses will get dirty and they will get hairs stuck on them. Nothing looks worse than taking a beautiful sunrise picture, blowing it up to an 8"x10", and seeing a large speck of dirt blotting out the sun. Never use your t-shirt to clean a lens, because this has the potential to scratch the lens and then leave you with bad images all the time.

Tripod
Not much needs to be said about this essential piece of equipment, other than this: spend the money to buy a good one. Cheap tripods have a habit of wobbling when fully extended. The better the tripod you can afford, the better your long lens photos will be. From my experience, I can tell you this: if you spend the money to buy a lens longer than 500mm, then you should spend at least $100 on a tripod.

Camera Bag
I bought a Canon Camera Backpack. This backpack has padded internal compartments for all my equipment, exterior pockets for water and film, padded straps and a sternum strap to make it easy to haul on your back. It also has a pair of ties on the bottom of the pack to attach the tripod. This back is absolutely essential for long photo expeditions or whenever you want to carry a lot of equipment with you, but I also suggest getting a smaller bag or fanny pack for just carrying a body, lens, and filters.

Keychain ID Tags
I bought a set of multi-colored tags from Lowe's Home Improvement for a couple of dollars. I labeled the tags 100ASA, 400ASA, 800ASA, and B&W. Each time I loaded one of my two cameras with film, I attach the appropriate tag so I won't forget or get confused later.

Flashlight
Good for when you are doing Night Photography. I bought a small keychain LED light which works perfectly.

Bug Spray
Trust me, if you are out in nature, the last thing you want is to be eaten alive while trying to take slow and careful pictures.

Filter Case
If you spend the money to buy the filters, the best idea is to protect them as well. The filter case also makes it easy to find filters later.

Small Notebook
When starting out, take notes on every picture you take. A small notebook will be handy when taking these notes, remembering great locations, and jotting down names of people you'll inevitably meet while out taking photos.

So, this is all my equipment. It took a long time to gather it all up, nearly half of it was given to me by my grandmother, but at least now I have a nice set. All I really lack is a good flash and I'll be set with my 35mm film camera.

Tuesday, May 26, 2009

An Awesome Sunset

I decided this time to give a sunset a try. Of course, I live on the East Coast, so sunsets over water aren't exactly an option. Except that I also happen to live at the beach.

I went out to Wrightsville Beach, which is on an island just outside Wilmington, North Carolina. So, I walked along the backside of the island and was able to capture this photo as the sun set over the sound between the mainland and the island.

This photo has been slightly altered using iPhoto to boost color. The original was not bad, just flat. I believe the flat image is a result of fast exposure time. I used a 50mm lens to capture this photo, but because the sun was so bright I dropped the exposure time to just 1/125. I think this is too quick of an exposure for capturing good color.

This is one of my favorite pictures of all time. When I took the photo, I didn't know I was creating a silhouette image. I used a 50mm lens, a 1/250 exposure, and a small aperture of just f/16. The quick exposure and small aperture combined to take a great picture of the bright sun but a dark image of the foreground.

The next image is also one of my favorites. I took all the images with 100ASA film so the grain would be very tight. The main reason for this is that I could get enlargements made. I have an 8"x10" enlargement of the last two images framed and hanging on my wall. The slower film speed means enlargements look better.

This image was actually the first I took as soon as I got out to the beach that day. I went with a friend of mine because we wanted to watch a perfect sunset together. Almost as soon as we got the water's edge Holly spotted this sailboat cruising the water. Although I have learned all about patience I have also learned there are times to be very quick with whatever you are trying. I quickly pulled out my camera, switched to the 135mm lens, tried to set exposure and focus just in time to get this single photo snapped off. I think it turned out pretty well.

Saturday, May 23, 2009

A Day at Greenfield Lake: Learning Patience

I took a day and walked around Greenfield Lake. It is interesting that a beach town like Wilmington, North Carolina would also have a large, beautiful lake such as Greenfield Lake. I grabbed my small, cramped, over-used camera bag and went out for a little stroll. Little did I know that it was a little over 4 miles to walk completely around the lake. I didn't realize this until I hit mile marker 2...and which point it would have been the same for me to turn around as to keep going.

I snapped off two rolls of film and could have taken many more...except that I could only fit two rolls of film in my small camera bag. But I learned through my 3 hour hike around the lake to fully appreciate patience.

I found these two quacky animals about 30 minutes after I started hiking. Of course, to get the picture you see took me nearly 15 minutes of patience. I used a 135mm lens to get a tight fit, stood about 10 feet away, and waited. And waited. I wanted a picture where you could see both heads turned opposite directions. They would waddle, quack, and snort...but it was fifteen minutes before they finally posed like you see above. It was well worth the wait.

This picture was taken a few minutes later. I learned with this picture that sometimes people can be a problem. The bridge in the background was full of kids playing in brightly colored shirts. It was distracting. I wanted you to take notice of the moss hanging from the tree in the foreground. I purposely used a shallow depth of field so the background would be out of focus, but that just made the bright red and yellow shirts even more distracting. So, I waited until all the people were gone, ready to snap off a photo, and captured what you see above.

Cars or no cars? That was the question I asked myself as I waited for this photo. Cars can be so distracting. A person could look at the above photo and ask, "Am I supposed to pay attention to the color of the car? The make? Model?" So instead I waited patiently until the road was devoid of any vehicles and snapped this photo. It was worth the wait. The curvy road reminds me of home in the Appalachian Mountains of Virginia.

This final picture was more about detail than patience, but it took both. Sometimes patience is not really necessary in waiting for the perfect composition, but sometimes when trying to compose the shot. I mounted the camera to the tripod and easily set my exposure and aperture, but finding the right framing took some time.

I tried many variations before snapping off a few photos. Different heights, angles, and positions. I tried in front of the bush, and then behind. I focused on the water fountain, and then the bench. Took a lot of patience to find the right frame.

This is the moment when I add a little insert about the main difference between SLR and Digital SLR cameras. A bad difference. People with DSLRs tend to snap off hundreds of images a day. In fact, some people with a DSLR would have snapped off maybe a hundred pictures of just the composition above. Why? Because they can. I tried several variations before I found one I liked, and then snapped off about 5 photos. The difference? Do you really learn how to take good pictures by taking 1 good and 99 bad? It's like your hearing: if you force your ears to listen to something at a low level, you exercise your hearing. And if you force yourself to take 5 good photos, you exercise your photographic skills.

Friday, May 22, 2009

Ten Tips for Great Photography

I have been taking pictures with my Pentax K1000 35mm film camera for a couple months now. I have done extensive online research, read several books on the subject, and through my own experience I have come up with a list of ten tips I think could help anyone interested in photography.

  1. On long journeys, prepare for anything. I like to carry a couple of lenses, filters, several rolls of film (different speeds and B&W), and a tripod at all times. Sometimes I carry even more than that.
  2. Load film carefully and make sure it advances before closing door. Nothing is worse than spending a day snapping off 36 photos only to discover you never properly loaded the film. Load it carefully, make sure the small teeth are engaged in the holes on the edge of the film, and then gently close the door.
  3. Keep lenses clean. I keep caps on both ends of lenses not in use at all times, and when I attach a lens to the camera body I keep a lens cap on when not in use. Usually when looking through the viewfinder, you will not see a finger print, smudge, or spot of dirt. In fact, you usually won't see any of those until you have the film developed, see a breath-taking image, and try to get an 8"x10" enlargement. Then you see all the ugly details you missed before.
  4. Squeeze the shutter button, don't press. The difference is how much you shake the camera. Especially if you are using a longer lens, something above 100mm, you want to keep the framing as steady as possible. Compose your shot, adjust focus and aperture, then gently squeeze the button.
  5. Be careful with built-in light meters. Light meters inside cameras are Spot Meters, meaning the camera measures light bouncing from a certain spot within the frame. This spot is usually the very center, and only measures about 1/20 of the entire frame. If you are taking a picture that has a very dark and very bright light source within the same frame, the meter will only measure what is at the very center. Tip: frame your composition, then going from that framing point the center of the camera toward the brightest spot and use that measurement.
  6. Read, read, read. Find websites that give out tips with photographic examples. Hit up your local library (yes, they still exist). Buy a few inexpensive books from Barnes & Noble. The point is, read up on what others have done before you. There is no point in spending a lot of time and money on film to learn what others have already learned. Pick a particular subject, such as Night Photography, and then read everything you can find on the subject. You will be better prepared.
  7. Use the right film for the right situation. I only buy 36 exposure film (hence the name of the blog) because it is more cost-efficient. Think about it: the cost of developing and a picture CD is the same regardless of exposures. Film speed is another consideration: the lower the number (100) the more light is necessary, making it a slower film. 100ASA is good for bright sun, 800ASA is good for low light and action shots.
  8. Take your time. I will spend anywhere from an hour to three hours to snap off a 36 exposure roll of film. Photography is a patient hobby, so if you don't like to take an hour out of your day to snap off a roll, then don't waste the time at all.
  9. Take notes. At the start, taking notes on film speed, aperture, exposure, focal length, filters, and details on lighting. Then, once you have the film developed you can compare notes to see which pictures turned out best and then duplicate the results.
  10. Be a director. While it is nice to capture a slice of life in the spur of the moment, such as a child laughing to a silly joke, it is equally nice to compose a picture. Instead of letting a few people simply stand in a line for a picture, get them to move around, duck, kneel, stand, smile, whatever works well for your location. Direct the action.

Monday, May 18, 2009

Macro Photography: Getting Close

I recently bought a set of Close-Up filters for my Pentax camera. At first, I was a little confused on how exactly to use them. I slapped them onto my 50mm lens and I just couldn't seem to get it to focus. That's when I moved the lens closer.

Close-Up filters typically come in +1, +2, and +4 increments. The larger increment always goes closest to the lens. You can also stack the filters on top of each other for additional power.

The purpose of the close-up filter is to allow the lens to get closer to a subject. All lenses have a minimum focus distance. The minimum focus distance for a 50mm lens is about 3'. But the close-up filters allow you to move the 50mm lens closer, allowing the subject to fill the frame. I practiced focusing on a penny. With the 50mm lens, the penny filled about 1/20 of the frame. With a +1 filter, the penny filled about 1/10 of the frame. The +4 filled the entire frame, and the lens was just a few inches away.

I took this photo using a 50mm lens and a +2 close-up filter. The flower itself was only about 4 inches in diameter, but with the close-up filter I am able to fill the entire frame with the subject.

This can come in handy when I want to take photos of very small objects such as insects, coins, or pieces of objects such as a bottle neck or tip of a pen. The difficult part about using this lens, however, is that the focus area is much smaller. With a +4 close-up filter added, the lens can only move half an inch either way before it loses focus. This means it is very wise to use this with a tripod or clamp to hold the camera steady.

Friday, May 15, 2009

Sunrise on Wrightsville Beach

It was an early morning. I hadn't been sleeping much anyways, so I decided to head out to the beach and snap off a roll of film. It was a beautiful morning, at least.

I used 100ASA film for this. It was about the perfect film to use for a couple of reasons. The first is 100ASA film needs lots of light for proper exposure, and I was taking a picture pointed directly at the sun. The second reason, specifically for my purposes, is that 100 speed film makes for near-perfect enlargements. You can easily enlarge 100 speed film with fear of seeing the grain, because the grain in this speed film is really small and finely packed.

So, I grabbed my small camera bag and a grass mat to put it all on the beach with, and headed out toward the darkened sky. It was funny because the sunrise was at around 6:15AM. I left my apartment at 5:30 thinking I had plenty of time. I would have, if the bridge to Wrigthsville Beach wasn't up for some sail boat trying to get an early launch. I had to load my film in the truck while waiting, because by the time I actually got to the beach the sun was almost up.

This was the best picture I came out with, and this one has been edited to enhance colors. Since I was shooting into the sun I used a smaller aperture and quick exposure, which also helped to capture the action of the waves.

About a week after I took this picture, I bought a sunrise filter off Ebay. The sunrise filter is half shaded in orange and half clear. The purpose is to rotate the filter until the orange covers above the horizon, giving the sky a nice color while leaving everything clear and natural. I will post more sunrise/sunset pictures as soon as I have taken them, but 5:30AM is early for me.

Monday, April 13, 2009

Capturing Motion in Photography


I wanted to capture some great motion in film photography, but I quickly discovered using the "normal" exposure of 1/60th was not going to work for these pictures.

I discovered along the way a general rule of thumb for setting minimum exposures: the minimum exposure is equivalent to the size focal length you are using. For example, if you are shooting with a 135mm lens, the minimum exposure should be 1/135. I have found that 1/125 works fine with this size lens, but nothing less. Now, this is all a general rule for handheld use; placing the camera on a tripod and using a shutter release cable changes everything.

So, in order to take the pictures below I used a 135mm lens, with a shutter exposure set around 1/250 and a large aperture to make up for the loss of light. 1/250 is pretty fast, and captures motion fairly well. The Pentax has a minimum exposure time of 1/1000 and I have found this to be more than enough for any type of action shot.

First of all, this picture should be compared to a similar one I took a few weeks ago in B&W film. You can see the difference in composition between full color and black and white.

I wanted to capture the motion of the water fountain in a freeze frame, instead of a motion blur. If I had used the typical 1/60 exposure, the water fountain would have been blurred together. Instead, I used a 1/250 exposure and got this great picture.

I love this picture. This was taken in front of the Burney Center. Again, I used a 135mm lens, 1/250 exposure, and a large f/5.6 exposure. This captured the motion of the water in a freeze frame. I love water features, and this picture captures that motion beautifully.

Wednesday, March 25, 2009

35mm Film: A Tutorial

The biggest difference between an SLR and DSLR is film. All SLR cameras use film of some type, the most typical being 35mm. This tutorial will go over the differences in film speed, brands, and uses.

Film Speed
Film speed is a numerical scale labeled as ASA (American Standard Association) and ISO (International Standards Organization). Both of these scales are the same and it does not make much difference which way you label it. However, since all film purchased in the United States will be labeled with ASA, this is the label I will use here.

The different film speeds refer to the difference in how sensitive the film is to light. The lower the number, the more light the film needs to properly expose. Below is a list of the different film speeds available and their difference in light sensitivity.

  • 50ASA
  • 100ASA = +1 stops
  • 400ASA = +2 stops
  • 800ASA = +3 stops
  • 1600ASA = +4 stops

What this all means is that if you can get proper exposure using 50ASA film at f/8 and 1/60 exposure, then using 100ASA film you would use an f/11 or 1/125 exposure. The difference between each film speed listed above is just one stop.

You can also look at the list this way:
  • 50ASA = slowest
  • 100ASA = slower
  • 400ASA = slow
  • 800ASA = fast
  • 1600ASA = faster
A 50ASA film takes much longer to properly expose than an 800ASA. The lower the ASA number, the more light that is required. Why is more light required? When you get right down to the technical details of film, it is composed of grains. These grains react to light and "expose" themselves to create a negative image, from which a color or B&W print can be made. Well, lowers ASA films have much smaller, tighter grain that require more light to "expose" them. So, 50ASA film would take approximately 4 times longer to expose than 1600ASA film using the same lighting and aperture setting.

A smaller ASA value also means you get better enlargements. When printing a negative at a 4"x6" or even 5"x7" you won't see much grain difference. But if you want an 8"x10" or larger, up to a poster print, you will start to notice a graininess to the picture. Remember old 120 film prints from the 1960's that were blown up to 36"x36"? Remember how grainy and washed-out they looked? That is a result of the grains of the film stock.

The smaller ASA values give you the greatest quality and detail when getting enlargements made. I myself only shoot on 100ASA or 400ASA film. I have never used anything higher than 400ASA and don't see any reason why I ever would.

Film Brands
There are many different brands of film out there, of course Kodak and Fuji being the most popular. But are they the best? I'll list some brands here, of which I have only used 3, and some details about which is better for which situations. Here is a list, which is discussed in more detail below:
  • Agfa
  • Efke
  • Foma
  • Forte
  • Fujifilm
  • Ilford
  • Kentmere
  • Kodak
  • Lomography
  • Rollei

Before I get into this, a good suggestion would be to never buy film from Walmart or Target. I don't say this to make a political statement about the stores themselves, but rather about the film. Walmart and Target only sell 24-exposure rolls of film. If you find a local mom-and-pop store you will probably find 36-exposure film for a few cents more. And, in my experience, if you buy about 8-10 rolls at a time they'll even give you a discount. I'd like to see Walmart do that.

Kodak is by far the most popular and recognizable film on the market. It is sold just about everywhere, still, even though the demand for 35mm film is only a fraction of what it used to be ten years ago.

Ektrachrome is the best film Kodak makes. However, I have never used it. In fact, I don't use Kodak film at all. Despite the popularity and innovation of Kodak, I feel they are now just cashing in on a brand name without worry for quality.

I prefer Fuji film. It's all I use, all I would recommend. Fuji makes a great 100ASA film, Reala, which you can usually find at photography supply stores for about $4 for a 36 exposure. I also buy Fuji Superia 400ASA film. Those are the only two film types I buy much of, considering that those are the best film speeds for enlargements. The 400ASA can capture good lower-light situations, and the 100ASA will give the best quality for making poster prints.

What I Don't Know
I thought I would add a short section about what I don't know about film. I have heard of the following topics, but I have not gotten to them yet. So, at least in reading this you will be aware they exist.

There is a debate about print versus slide film. Any film that is processed C-41 is print film, which is your typical film found almost anywhere. Slide film, however, is a bit more difficult to find and a lot more difficult to process. Even my local film developers don't do slide film. For that, I have to mail it off.

You can get very technical with film and start discussing reciprocity and saturation. There is also a lot of science behind low-light or night photography. This is useful to know if you plan to do light trails or photographs of the moon.

Saturday, March 21, 2009

Working With a Pentax K1000: A Tutorial

About 5 years ago my grandmother gave me a Pentax K1000 35mm film camera. I laughed inwardly, but instead I said thank you and stuffed the aging camera into a box. I had just bought my first digital camera, a Kodak, and I was very happy with it.

In fact, I was happy with my Kodak and Canon digital cameras for the next 5 years. But recently I decided to pull that old Pentax K1000 out of the box, dust it off, and start using it. I was amazed at the pictures I was able to shoot. The options are much wider with a film camera than the simpler point-and-shoot digital cameras.

As I started using the Pentax K1000, I came across a lot of questions that took me a long time to finder answers to. So, I've put together a sort of Pentax K1000 tutorial here that will help anyone who is fortunate enough to have this camera in their arsenal.

NOTE: I have managed to lose the charging cable to my digital camera, so I will have to post pictures to go with this tutorial at a later date.

Getting to Know the Camera Body
The Pentax K1000 is a fully manual 35mm camera. It uses standard C-41 35mm film. On the camera body you will find settings for film speed and exposure.

The film speed is an ASA/ISO number. ASA stands for American Standards Association and ISO for International Standards Organization. They are basically the same thing, and the numerical scale relates to a film's sensitivity to light. For more information on 35mm film, read my Film Tutorial.

The Film Advancer is located on the far top-right of the camera body. Use this to advance the film negative after each time you depress the shutter button. It also features a counter. One important note about the counter: it does not always count to "24" for a 24 exposure or "36" for a 36 exposure. After you have loaded the film, always advance the counter to "0" to ensure you won't be using exposed film from loading.

Next to the advancer is a round knob used for setting film speed and exposure. You will notice an "X" next to 60 on the exposure wheel. This is because the "standard" exposure is 1/60 for 35mm film cameras. I say "standard" because once you become more familiar with exposure you will find there is no such thing as standard.

Above and between these two wheels is the Shutter Release Button. You know how this works. This is also where the Shutter Release Cable screws into the camera using small threads.

The very top of the camera is the Flash Attachment, where you can attachment most types of flashes. However, I would recommend never actually using this port for a flash. You can read my Flash Tutorial to see why I would make such a comment.

On the top-left side of the camera body is the Rewind knob. After you have finished up a roll of film, you depress the Film Release Button on the bottom of the camera, then wind the arm on the top clockwise until the film is wound up. Pulling up on this arm will also release the film door.

The K-Mount Lens
One question I spent hours scouring the internet to locate is the diameter of the K-Mount lens: 49mm. This will become important when buying filters since lenses come in a large array of diameters.

Pentax developed the K-mount lens specifically for the K-series of cameras. What this means is that when you are searching for new lenses for your K1000, you can only buy K-mount lenses to work. Even if the lens is 49mm in diameter, it will not work in your camera.

A small tab along the edge of the body where the lens attached is depressed whenever you want to remove the lens. After depressing this black tab, twist the lens counter-clockwise to remove.

When attaching a lens, two orange dots should line up between the lens and camera body before twisting clockwise until the tab locks into place.

Thursday, March 19, 2009

B&W: Round Two

I took a day, escaped from everyone and everything, and walked around Wrightsville Beach for a few hours. These are the pictures I took, all with 400ASA B&W film.


I took this picture on the backside of the island, on the sound. Several boats were floating out in the water that day, anchored, waiting for someone to return I would guess. What I really like about this composition is the reflection in the water. It was a very calm day, and mostly sunny.

I wanted pictures of seagulls on this day. I stood out on the Johnnie Mercer's Fishing Pier for nearly three hours to get these few pictures of the birds. The problem was that I wanted to use a 135mm lens to capture a close-up of the birds, but that made framing and focusing very difficult. I kept my camera pointed at this sign for 10 minutes before I finally caught one of them flying away.

This is my favorite B&W picture yet. I have always felt the purpose of black and white photography is to capture something that would not look as good in color. For example, what would be the purpose of taking a B&W picture of a rainbow? Or a rose bush? For the picture above, I love it because the seagulls look perfect set against a gray sky. A blue sky may have drawn your attention away, or taken away from the birds.

I finally caught this picture of a seagull swimming out over the ocean. Again, I liked the B&W composition more than I would have liked a full color.

Saturday, March 7, 2009

My First Roll of B&W

Two days ago I walked around the UNCW campus and snapped off my first roll of Black and White film. I have only been using my Pentax K1000 35mm film camera a few days, and so I'm not really sure how everything works yet.

After doing some reading, I found that everyone seems to start with B&W film. Apparently, using B&W film is a great way to learn proper exposure. With a limited range of colors in the black and white spectrums, you pay more attention to lighting and focus.

I slapped a new battery in the camera so the light meter would work properly, loaded it with 400ASA B&W film, and headed out for the day. Here are some of the pictures I got that day.


I feel this picture is slightly over-exposed. My meter had a good reading, so I might just need to close the iris down half a stop to compensate. This picture is a bridge that crosses over one of the three ponds in the center of our campus.


The above picture is my favorite of this roll of film. Because all of these were exterior shots, the sun was my key light, or main source of lighting. On the day I had taken the pictures, the sky was partly cloudy so no harsh shadows were created. I think this actually gave the pictures a flat appearance, but it worked well.